 Butch O'Hare Chapter, IPMS-USA
  Butch O'Hare Chapter, IPMS-USA
Saturday, October 1st, 2011 by Carl Knable

“To stand or not to stand, that is the question . . . ” In the early days of plastic model aircraft (‘50s and ‘60s), stands were a mandatory item in kits. Most of the kit stands, with the exception of Revell, were pretty clunky looking, and most ended up in the landfill. Until recently, if you entered a model on a stand in an IPMS contest, you were wasting your time! As such, I would never have considered building a model on a stand.
About five years ago, as my display shelves were getting full of gear down aircraft, I realize that if I put some aircraft on stands, I could almost double the number of models I had in each case. I remembered the neat Revell stands--a clear base disc with a clear support--so I started looking at the McMaster-Carr supply catalog for possible materials. I wanted a stand that was easy to make and inconspicuous. Here’s what I came up with:
Building the Stand
Materials: The stand base is made from
extruded clear acrylic discs, available in 2", 3", 4"... diameters and two
thicknesses: approximately 1/8" and 1/4" thick (see attached material list,
item #3). The vertical support for each stand is made from 1/8" diameter clear
PETG plastic rod for small, lightweight models (material list item #2), and
1/4" clear tubing for large, heavy models (material list item #4).
 Construction:
For small models, use a 2- or 3-inch, 1/8" thick disc). Drill a 1/8" hole
in the center of the disc. Then attach a 4" to 5" piece of 1/8" PETG rod to
the disc. (The end of the rod is slightly crimped--with pliers--to ensure
a tight friction fit between the end of the rod and the disc.)
Construction:
For small models, use a 2- or 3-inch, 1/8" thick disc). Drill a 1/8" hole
in the center of the disc. Then attach a 4" to 5" piece of 1/8" PETG rod to
the disc. (The end of the rod is slightly crimped--with pliers--to ensure
a tight friction fit between the end of the rod and the disc.)
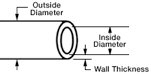
For larger models, use a 4" disc. Drill a 1/4" hole in the middle, and attach a 4" to 6" piece of clear tube (again, using a friction joint). Note that this stand is attached to the model using a short 2"to 3" section of 1/8" rod, which you can insert into the model (see next section) and then into the 1/4" support (which has a 1/8" inside diameter opening).
Attaching the Model
The stand attachment opening in the model is added shortly after the fuselage
halves are joined. At the midpoint of the fuselage, drill a 5/32” hole into
the bottom of the fuselage (photo A).
Next, place a section of 5/32” diameter aluminum tubing (K&S Engineering stock #103) through the hole and super glue it into the fuselage (photo B). Then, sand the bottom of the aluminum tube flush with the lower fuselage. You now have an aluminum sleeve in the fuselage, with a 1/8” inside diameter. The 1/8” stand support will slide directly into this opening. Note that this aluminum sleeve is also excellent for holding the model for painting and decaling. (Use a 1/8” barbecue skewer to hold the model and insert the skewer into a piece of Styrofoam--see photo C.)
A few parting thoughts after five years of building and using these stands: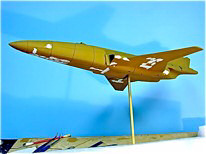
Materials List
All of the referenced plastics materials are available from McMaster-Carr
Supply Co. in Elmhurst. Materials can be order online, paid for by charge
card, and picked up at the will-call desk:
600 N County Line Road
Elmhurst, IL 60126-2081
Will Call Hours
Monday - Friday 7:00 am - 6:00 pm
Saturday 7:00 am - 2:00 pm
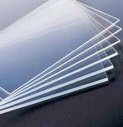
Note that I have also included information on clear polycarbonate sheets (item 5). I have been using this material for vacuforming canopies for several years, and it beats any other clear material I have ever used. Plus, the cost is less per square inch than the comparable material from Squadron or MicroMark. It comes in 24" by 24" sheets, and in various thicknesses. (I have been using .010" and .015.)
Specs, part numbers, and prices:
1. Clear PETG Sheets 1/8” thick
(± 0.012"); Smooth Finish
https://www.mcmaster.com/petg/color~clear/
 Good Electrical insulator
Sizes: 12" x 12"; 12" x 24"; 24" x 24"; 24" x 48";
48" x 48"; 48" x 96"
85815K14 4.25
85815K24 7.64
85815K35 13.46
85815K45 26.02
85815K65 45.22
85815K85 81.75
2. Clear PETG Rods-Smooth Finish https://www.mcmaster.com/petg/color~clear/
 Sold in 6-ft. lengths (1/8", 3/16", 1/4")
1/8" ± 0.005" 8325K13
$0.14
3/16" ± 0.007" 8325K15 $0.28
1/4" ± 0.010" 8325K17
$0.51
3. Clear Extruded Acrylic Discs
https://www.mcmaster.com/acrylic-discs
 Color: Clear
Temp. Range: 32 to 160ºF, unless noted
Softening Temp.: 191 to 239ºF
Cut from sheet for clear, smooth face. Thickness tolerance is ± 0.006"
for 0.118" thicknesses and ± 0.012" for 0.236" thicknesses.
Meets UL 94HB for flammability.
Sold in 6-ft. lengths
2" ±0.031" 8581K22
$2.47
8581K33 $2.66
3" ±0.031" 8581K23
$3.02
8581K34 $3.25
4" ±0.031" 8581K24
$3.91
8581K35
$7.84
4. Clear Butyrate Tubing
https://www.mcmaster.com/butyrate

 Plastic Butyrate, Color Clear
Length 6'; Outside Dia. 1/4"; Inside Dia. 1/8"
8565K31 $1.84
5. Polycarbonate
https://www.mcmaster.com/polycarbonate
 Color: Clear, unless noted
Temp. Range: -40° to +200°F, unless noted
Softening Temp.: 290 to 315°F
24.5" x 24.25"; 24.5" x 48.5"
BOTH SIDES GLOSS
Thickness:
0.005" ± 0.0005" 85585K102 $2.33
85585K72
$4.10
0.010" ± 0.0010" 85585K103 $3.92
85585K73
$7.02
0.015" ± 0.0015" 85585K14
$5.45
85585K24
$9.50
0.020" ± 0.0020" 85585K15
$6.97
85585K25
$12.18
Comparable to Lexan, Hyzod, Tuffak, and Makrolon. At only half the weight
of glass, this material maintains excellent clarity and impact strength over
a wide temperature range. Often used as windows, instrument gauge covers,
machine guards, and signs.