Home
About Us
Events Newsletters
Articles
Gallery Contests Contact Us
Our Store
The How-To-Hootch: Ward's Workshop - Casting
Resin Parts in an RTV Two-Part Mold
Sunday, October 2nd, 2011 by
Keith Ward
- Open up a funnel-shaped passageway into the highest
point of the mold cavity, using
a sharp blade to make the opening
as large as practicable. You may also need to cut an air escape passageway for some cavities
to fill completely.
- Cut two pieces of .060 or heavier plastic to support
the two sides of the RTV mold. (these are our mold support plates)Parting
agent - baby powder works best for
me. Use a soft brush to lightly coat everything inside the mold
cavity, carefully blowing away any excess powder.
- Line up the mold locating points, and using the two
mold support plates, rubber band the mold halves together. Use rubber bands
that can hold the mold firmly together without distorting the RTV.
- Resin - get the 3 to 7 minute pot-life type because
air bubbles are your enemy in this casting process, and they need time to
rise out of the pattern area before the resin starts setting up. (Alumalite
has a pot life of 30 secs.)
- Mix resin 50/50 (measuring accuracy really counts here)
into a plastic throwaway cup. Stir slowly
to avoid as best as possible, too many air bubbles. (You just cannot get
all of the bubbles out at this stage.)
- Pour the resin mix slowly
into the mold passageway opening. When the mold is full, lightly squeeze
the mold and "burp" the mold, hopefully
getting the last air bubbles out of the pattern area.
- Let the resin cure for 45 minutes, and then remove
the rubber bands and support plates. Carefully open the mold halves and
inspect your new resin part!
- For repeat castings, dust interior of mold halves with
more baby powder and make another resin casting.
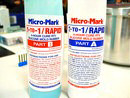
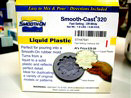
The most reliable products I have used are:
Micromark
# 82083 One-to-One
Rapid Rubber RTV
(micromark.com)
800-255-1066
Smooth-On Co.
# 321 Smooth-cast Resin (7 min. pot life) 
(smooth-on.com)
800-762-0744
© Butch O'Hare Modelers
- IPMS
 Butch O'Hare Chapter, IPMS-USA