The How-To-Hootch: Ward's Workshp - RTV Molds
& Casting Resin Parts
Sunday, October 2nd, 2011 by Keith
Ward
Make a master part to be copied as best as you can (quality
will not be improved by the casting process).
Make a mold box (Lego blocks!) for the walls; .060 plastic
for the base. There is no need to glue any of these pieces together - use
clay to hold the walls to the base.
Press clay into the bottom of the mold box, covering
the floor to about halfway up the walls. Push your master part into the clay
and seal edges with clay halfway up the sides of the master part. Use a paintbrush
handle to make a few shallow locating pockets for the second half of your
RTV mold.
Parting agent - 50/50 mix of mineral spirits and petroleum
jelly.
Lightly coat master part, clay, and inside walls of the
mold box with parting agent using a soft brush. Be careful to avoid puddles
of parting agent in any master part cavities.
Prepare a 50/50 mix of RTV in a plastic throwaway cup,
stirring thoroughly until the mixture is all one uniform color. The exact
mix proportion does not seem to be critical as long as you are close to 50/50.
Pour the RTV mix slowly in a thin stream (to minimize
air bubbles) into a corner of the mold box until it is full. It is OK to work
RTV into small cavities with a toothpick as you fill.
Allow 6 hours for curing. Heat will speed up the process,
but be careful: nothing over 120ºF.
When RTV is cured, turn over your mold box over and remove
all the clay, being careful not to dislodge the master part from the cured
RTV. If the part does pop out don't panic. Just very carefully push it back
into its RTV socket!
Clean any small deposits of clay from the master part
using a stiff brush and mineral spirits.
Repeat steps 5 through 8 to make the second half of your
RTV mold.
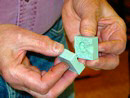
After the second RTV mold half has cured, take the mold
box apart to reveal your new two-part RTV mold. Open the mold and remove the
undamaged master part. This completes the most difficult process of our project
 Butch O'Hare Chapter, IPMS-USA